Basic Commands


Overview

This section will go over what a command is and some basic examples of how to start typesetting. It will also cover how to use packages to extend functionality.

How did we do it?

Let us take a look at the code you wrote for last section which is given again to the right. Here we want to look only at the first two lines and the last line. These are what we will refer to as commands. They will be the basic foundation to typeset your content. They interact with the compiler and tell it to perform tasks. They are one of the main differences between LaTeX and WYSIWYG as they do not appear in the typeset document the same way as they do in the source code.

\documentclass{article}
\begin{document}
This is my first \LaTeX document!  
\begin{equation}
     a^2+b^2=c^2
\end{equation}
I can write equations!
\end{document}

Commands

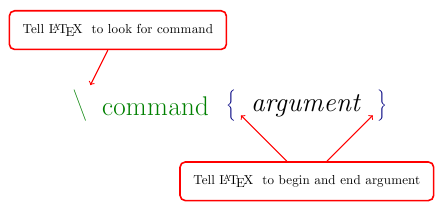
The general syntax for commands in LaTeX is \command[options]{argument}. In the example above, we have used four separate commands:

While the \LaTeX command is a nice touch and produces a fancily typeset LaTeX, the other three will be used in every document that you typeset! Lets take a closer look.

Command


LaTeX Logo
documentclass

The documentclass sets up what type of document you are working with, loads many default styles and sets the overall look and feel of your document. There are also class specific commands which have are only valid in certain document classes.

Some of the common classes and their uses are listed below, however, this list is far from comprehensive. There are many more standard classes and even more custom classes usually used for extremely specific purposes. I usually use either the article class or the beamer class for everything unless there is a custom class required for homework preparation. It is important to remember that all of these classes are flexible and there is no right way to use them. However,some classes more suited towards certain tasks.

documentclass Usage
article For articles in scientific journals, presentations, short reports, program documentation, etc. Possibly the most versatile class and the one I recommend beginners use almost exclusively at first.
report For longer reports of several chapters, small books, theses.
book For books.
memoir For books. Based on book class, but gives a bit more control over look and feel of document in a simple way.
letter For letters. Has many predefined commands to help correct letter style.
beamer For presentations. As article class is to Microsoft Word, beamer class is to Microsoft Powerpoint.

Note: Every document must have a class. If you do not have one, the document will not compile

begin and end

The begin and end tags signify the beginning and ending of an environment in the scope of your text. In the example above, they signify the boundaries the document environment, which is where the content to be shown is placed. We are going to explore the difference. try compiling two codes given below.

\documentclass{article}
\begin{document}
\LaTeX~ is awesome
\end{document}
\documentclass{article}
\begin{document}
\begin{center}
\LaTeX~ is awesome
\end{center}
\end{document}
Examples Together ››

It appears you don't have a PDF plugin for this browser. You can click here to download the PDF file.

x

Note that these examples have the same input text, but different environments. Much of the control one has with LaTeX is by using such environments. I like to think of them as clothes. Clothes are necessary for certain tasks and can change how one appears and how one functions. However, just as clothing only changes appearance, but not substance, environments are simply ornamentation. This is why LaTeX is content driven, it allows the typesetter to focus on the content and not as much on how it appears beyond predefined environments.


Packages

Although with just the basic LaTeX package one could theoretically typeset any document, in practice this would be very difficult. Luckily, there are packages which extend functionality of the language in ways such as improved design elements, graphic generation, etc. The example code on the right uses many common packages. Notice that the usepackage command is invoked before the begin{document} command. Also note that some packages have option arguments which go in the square brackets before the curly brackets.

\documentclass{article}
\usepackage[english]{babel}
\usepackage{amsfonts}
\usepackage{amssymb}
\usepackage{amsmath}
\usepackage{amsthm}
\usepackage{float}
\usepackage{graphicx}
\usepackage{enumerate}
\usepackage[margin=1in]{geometry}
\usepackage{tikz}
\begin{document}
I used some packages.
\end{document}

Below is a listing of some common packages and what they do. Many will be explained in more detail in subsequent sections. There is a more comprehensive list in the Resources section.

Package Usage Documentation
amsmath Allows use of extra mathemathical symbols and adds features to facilitate writing mathematical formulas. amsmath documentation
geometry Set up page geometry such as margins. geometry documentation
float Allows placement of figure and table environments to be fixed by user instead of by LaTeX float documentation
graphicx Allows external image importation of many different formats graphicx documentation
enumerate Allows lists to be enumerated by many different types of characters. enumerate documentation
TikZ/PGF Vectorized drawing package that produces high-quality figures. TikZ/PGF documentation
subcaption Allows multiple in-line floats in a float environment. Note: must be used with caption package. subcaption documentation

Occasionally, we have LaTeX commands that we use often and would rather not write out the entire command every time we need to use it. In this case, we are better off defining a macro to do the work for us. We use the command newcommand to define our new macro, which is really just a new command.

Below we have defined a command pder which produces a partial derivative. We then write out the full command in the first equation and use the macro in the second equation. Make sure they come out the same!

\documentclass{article}
\newcommand{\pder}[2]{\frac{\partial#1}{\partial#2}}
\begin{document}
\begin{equation}
\frac{\partial x}{\partial y}
\end{equation}
\begin{equation}
\pder{x}{y}
\end{equation}
\end{document}


View PDF ››

It appears you don't have a PDF plugin for this browser. You can click here to download the PDF file.

x

In this case, our syntax is \newcommand{name}[# input arguments]{input 1}{input 2}. Note that to define our command, we reference our input arguments as #1,#2, etc. We then call each argument with a separate bracket.

In general, macros speed the writing of the document, but slow the actual typesetting as the compiler must reference the definition. I tend to use them sparingly and usually for surprisingly simple, but very common tasks. Remember that a macro is only useful if you are going to be using it over and over again.


← Back
Table of Contents
Next →

Created by Zachary Glassman. Contact at zach.glassman@gmail.com